


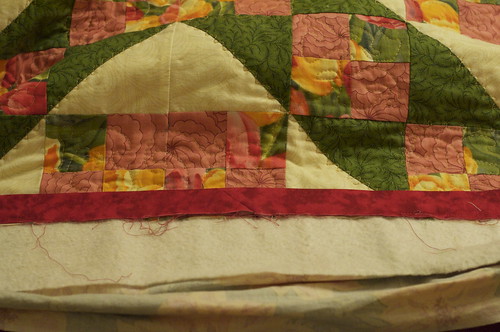
Last night I sewed the binding onto the Jacob's Ladder I'm working on, and I took photos to show how to use the Fons & Porter binding tool, which is really an excellent tool for perfectly fitting binding. But there is a trick that isn't mentioned in the instructions. Here are some photos of the process.
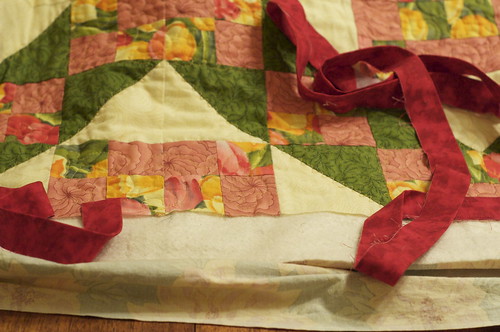
Step 1. Leave about 8 inches unsewn at the beginning when attaching the binding, and stop sewing the binding when there is about a 12" opening. I do not trim the extra batting/backing until the binding has been completely sewn on, but that's up to you - it makes no difference in the use of the tool. Face the quilt so that the open spot is in front of you and the body of the quilt is on your table. Trim the right edge of the loose binding so that it ends in the middle of the open edge.
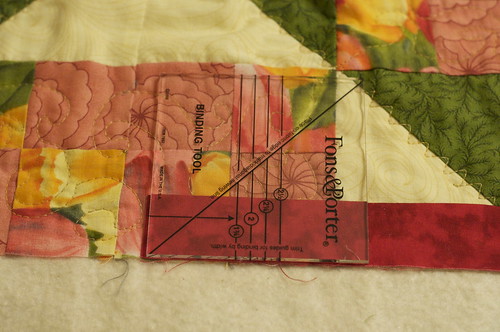
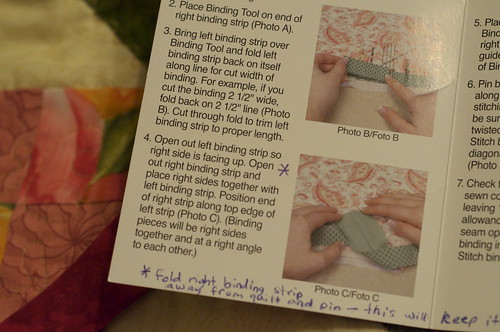
Step 2. Lay the binding tool on the edge of the strip, so that the words "Fons & Porter" are on the right and the left edge of the tool is on the very edge of the binding.

Step 3. Take the left binding strip and lay it over the binding tool. You will fold it at the marking line that matches the width of your binding. Mine was 2 1/2", so you can see the binding folded at the 2 1/2" mark. Trim the binding at the fold.
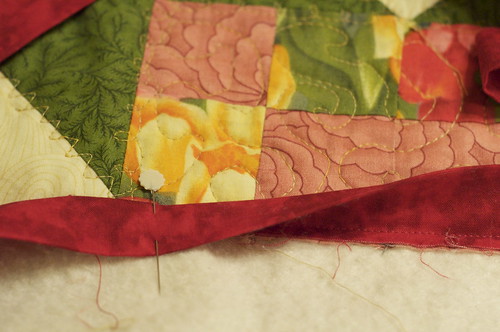
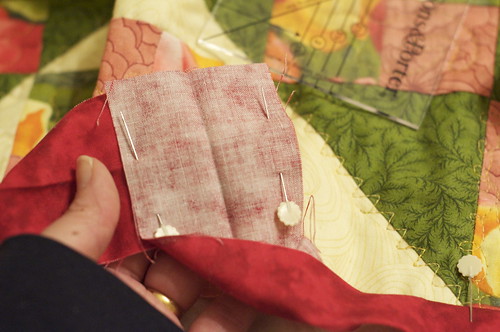
Step 4. MOST IMPORTANT STEP IN THE WHOLE PROCESS. The binding wants to lie flat against the body of the quilt. But you must take the right-hand binding and fold it down, away from the body of the quilt. Pin it where the stitching ends so that it will stay folded down.
Step 5. Write about Step 4 on the instructions that come with the tool so that you don't forget next time!
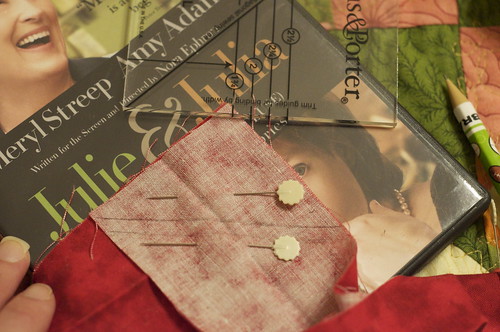
Step 6. Open up each binding strip and lay them together, with right sides facing. Align the raw edges and pin them together. You will have to bunch the quilt up a bit in the open space - that's fine.
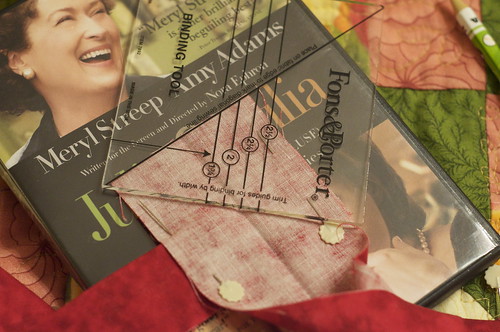
Step 7. Lay the binding tool over the binding segments and align the diagonal line marked on the tool with the raw edges of the binding.
Step 8. Use a sharp pencil to draw a line against the bottom of the tool, making a 45 degree stitching line.

Step 9. Stitch. If you are still skeptical and subscribe to the "measure twice, cut once" school of thought, baste it and test as shown in Step 10 below. Then stitch it once you are sure it will join nicely.
Step 10. Before you trim the seam allowance, check to make sure nothing is twisted and that the binding will lay flat. (This is where I kept running my head into the wall before I found the $20 solution - it would just not lay flat and was twisted every which way.)
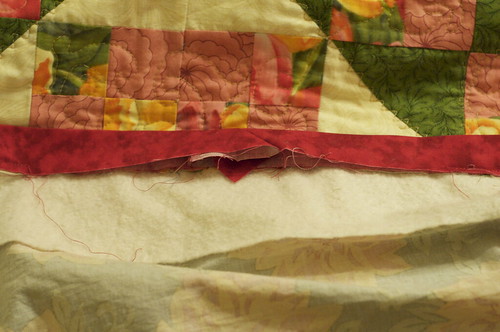
Step 11. Trim. Finger press the seam open and continue sewing the binding down along the open space.
Step 12. Pour yourself a stiff drink and celebrate, admiring your perfect binding!
I hope this is a useful tutorial for you if you have bought this tool and had trouble making it live up to its promise. I do find that it makes perfect bindings, now that I know to pin that piece down. Good luck - I'm not a professional quilting maven, so cannot take any kind of responsibility if you chop your fingers off! This is my first tutorial, so if you think it is confusing please let me know and I'll try to fix it up!
P.S. The binding for that Jacob's Ladder is all basted and ready to be sewn on tonight - I'll do the big reveal tomorrow.


30 comments:
YAY! Thanks for the tutorial. :o) (I may even buy a new one of those tools - because if I can find it, I probably can not find the written instructions - especially after my previous failed attempt to use it.)
I have used this tool 3 times in the past month and love it. I followed the instructions...which I keep loosing and they worked for me, but you are right they don't tell you much in that step 4 I just knew it from binding before, but if it was your first attempt it might not make sense.
Your tutorial was perfect!
always an awesome resource for me, and an inspiration!
things are looking really good on the quilt!
Cool! I use a tutorial on www.allpeoplequilt.com with good results. http://www.allpeoplequilt.com/techniques/finishing/joining-binding-ends_1.html
i have this tool and i love it! i'm confused, though-- i never felt like anything was missing from the instructions. my binding has always laid flat.
i guess i'm perfect like that.
:x
Thanks for the tutorial. I love your Step 5. I think I need this tool as I have binding issues ;-)
Great tutorial, but I'm having trouble getting past the fact that you don't trim the extra batting and backing away first. I also trim mine up first. Is there a reason that you do it that way? I'm always ready to learn something new.
What a great tutorial! Someone asked me to do a tutorial on my "Oh Christmas Tree" technique and I didn't know where to begin.
I think your teaching background is showing....
Thank you, thank you, thank you. I bought the tool because I saw F&P demonstrate it on their show this week, but when I tried it, I kept getting the binding twisted. I have written your step four on my instructions.
Found your tutorial as I was looking for the instructions to my binding tool which I've misplaced. Imagine that. Thanks for the great tutorial. Now I just need to figure a way to print it and hopefully keep these instructions!
Charlotte. Thank you, I have never successfully used the tool until today. I used your tutorial throughout and after 3 bastings, I finally saw the problem and I did it right!!!!. I usually don't brag, (yeah, right), but this was almost too good to be.
Thank you, thank you, thank you! I was about ready to loose my mind with the Fons/Porter binding tool and was determined to figure it out. I finally did a Google search and found your instructions. Actually I was pleased to hear I wasn't the only one having trouble using it. Anyway, I'm happily adding bindings to a set of placemats for my holiday table, thanks to you!
Jill W.
Ohio
THANK YOU!!! I just bought this to help me with binding my 1st quilt and couldn't figure it out. I'm quite disappointed that F&P left out a crucial instruction but I'm so happy that you shared your knowledge with us!!!!
Thank you! I just purchased this tool a few days agao and I tried several different times to use this tool and each time the binding was twisted. I finally gave up, thinking I was just tired and missing a crucial step. Thanks for helping me out with this. I can't wait to go home and try it again.
Today I couldn't find the directions for my ruler, so I went online to see if I could find them there and was so happy to find your site. Thank you so much. Your additional step was a big help too.
Thankyou!!! Couldn't find my directions & oddly couldn't find any help on F&P site. Googled and up you came. You are a lifesaver finished my fall wall hanging tonite-Thanksgiving tomorrow so it will be up one day!!
Alleluia! I couldn't figure out why when I folded my fabric and cut it, it was too long - duh I didnt fold it at the 2 1/2" line. I folded it at the end of the ruler. Second duh was the twisty thing that I somehow figured out on my own. Thank you so much for showing the pictures!!!
NICE!!! Great work here... I have trouble connecting my binding EVERY SINGLE TIME.
Thank you. Many people have tried to show me this technique without the tool. I have succeeded with your tutorial and bound several quilts with it and done well. I know where the tool is and where the tutorial is and the original instructions. You nailed the problem and it works.
I was about to pull my hair out using this tool until I ran across your tutorial. Thanks so much for the info in step 4---it solved the problem. You have provided a much needed public service. :) And your quilts are beautiful...
Thank you so much. Could not have done it without you. The photos helped lots!
\
thank you. . . I come back often for your explicit directions on using this tool, your the best for posting this since I can't fine my instructions!!
This is the second time I've come here for this explicit well explained binding tool instruction, thanks so much for your help!
just found your site,thank you. don't have the tool yet will get it this weekend. thank you again. Liz at home
Well, it's been said by other commenters to this blog but I need to say it too... THANK YOU! I stitched (and unstitched!) the binding join 3 times. I just couldn't get it right. I decided to do a google search on the F&P Binding Tool thinking perhaps someone made a video and I found your blog post. Fixed it in minutes with the help of STEP 4... Thanks again
I bought this tool, but I have gone back to my original way of sewing on a binding. It is a method developed by Maria Lage, a quilting teacher and speaker from Rhode Island. Her method is used by Rhode island and Connecticut quilters who learn of her method mostly through her workshops. Her method too does not address STEP 4, and I sometimes had difficulty with that, but the rest of her method is very easy and foolproof. I find it more straightforward than the Fons and Porter tool. I do thank you for the tip on STEP 4. Maria's method involves cutting off 2 inches of the end of the folded binding after binding is attached (make sure you have enough at the end), opening it up and placing the unfolded 2 inch long piece on the bottom binding (the start of the binding), then trimming the top binding to match the bottom binding. The 2 inch piece opened up should be the size of the binding; for example if you cut your binding 2 1/2 inches, the guide piece should be 2 1/2 wide also. I use the Fons and Porter square only to draw the diagonal sewing line. It is convenient for that since it is so small and fits in that space nicely.
Thanks very much - exactly what I needed! I love that this tool was the motivation for starting a blog. :)
Thank you for your detailed explanation WITH photos! You solved my dilemma!
This has always been so stressful for me. I could never figure the tool out....THANK YOU!!
Post a Comment
Thanks for dropping by - I'd love to hear what you think, so please leave me a comment!